

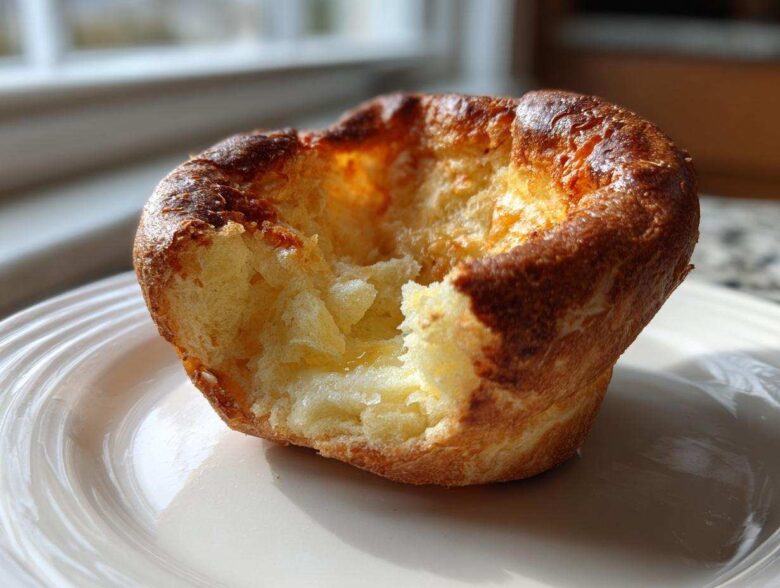
Listen, there’s nothing sadder than a flat, greasy Yorkie sitting sadly next to a beautiful Sunday roast. We’ve all been there. We’ve all cried over a fallen **yorkshire pudding** that just wouldn’t puff up! But I’m here to tell you: that ends today! Forget the YouTube chefs with their fancy tricks for a minute. What I’m giving you is the absolute, dead-simple, honestly foolproof recipe that guarantees those iconic, towering puddings—crispy on the outside, airy and soft inside. I spent years messing this up until I figured out the non-negotiables. Trust me, mastering this classic British side dish makes you feel like royalty at your own dinner table. If you’re looking to perfect those French toast mornings later, check out my tips on classic French toast right here.
Why This Foolproof yorkshire pudding Recipe Works (The Science of the Rise)
Honestly, getting a proper rise out of your pudding comes down to two main things, and they both involve heat. It’s not magic, it’s physics, folks! First, your batter consistency needs to be perfect. Too thick, and it won’t flow into that glorious puffed shape. Too thin, and it gets greasy instead of achieving those beautiful **Crispy Yorkshire Puddings**.
The second, and most vital, factor is temperature. You need the oil or dripping in the tin to be screaming hot—seriously, smoking hot—before that batter even gets near it. That sudden blast of heat hitting the cold-ish batter is what creates the steam puff that inflates the pudding walls. Keep this in mind, and you’ll never have a flat one again!
Achieving the Perfect yorkshire pudding Batter Consistency
Forget guesswork here; we want that **Easy Yorkshire Pudding Batter** to look exactly like single cream after you’ve whisked it smooth. It should pour off the whisk easily, leaving lacey ribbons behind. And here’s one of my favorite **Pudding Batter Secrets**: you absolutely must let it rest.
I know we’re all in a rush when we’re making Sunday lunch, but let that batter sit on the counter for at least 30 minutes, or pop it in the fridge for a few hours if you’re prepping ahead. This resting time lets the gluten relax, which prevents the puddings from becoming chewy later on. Don’t skip this relaxing period!
Essential Ingredients for Authentic yorkshire pudding
You only need five things for these puddings, which I absolutely love! It proves that the best, most impressive food doesn’t need a million fancy things in it. When the ingredients are simple, you have to make sure you’re treating them right. We’re sticking to the classic ratio here—it’s non-negotiable if you want that height. The ingredients list is short, but every item pulls its weight!
Here is exactly what you’ll need for about 12 individual puddings:
- 140g plain (all-purpose) flour – make sure it’s sifted!
- 4 large eggs – these need to be happy and warm.
- 200ml milk (whole milk works best, don’t go skimmed!)
- A tiny pinch of salt. That’s it for the batter!
- Vegetable oil or, even better, beef dripping, for cooking.
Ingredient Notes and Substitutions for your yorkshire pudding
Okay, let’s quickly talk about the supporting cast. They matter just as much as the flour and eggs when you’re aiming for the **Best Yorkshire Pudding**. The milk should ideally be whole milk; the fat content helps give the pudding structure and richness.
Crucially, remember what I said about temperature? Your eggs and milk need to be around room temperature before you start mixing. Cold ingredients shock the batter and fight against that lovely hot oil you’re preparing later. It makes a real difference in how much they puff!
Now, the fat choice. If you are making this for a roast beef dinner—which, let’s be real, you probably are—then you must try using beef dripping if you can get your hands on it. It gives a depth of flavor that vegetable oil, while perfectly acceptable, just can’t touch for a **Traditional British Side Dish**.
How to Make yorkshire pudding: Step-by-Step Instructions
Alright, now that we have our perfectly rested batter, let’s get down to the assembly. This is where speed and precision count! We need to combine the smooth batter with a ridiculously hot fat source. Follow these steps closely if you want those amazing **Fluffy Yorkshire Puddings** we talked about. If you’ve got some lovely asparagus ready to go too, don’t forget to check out my recipe for garlic lemon asparagus while the oven heats up!
First, get your oven preheated to 220C (that’s 425F or Gas Mark 7). You want that thing blasting hot before anything goes in. Then, pour about a teaspoon of your chosen oil or dripping—remember, dripping is king!—into each section of your 12-hole muffin tin. Place that tin right into the middle shelf of the oven.
The Crucial Step: Heating the Fat for Fluffy yorkshire Puddings
This is the absolute make-or-break moment for **How to make Yorkshire Puddings** that soar! You must let that tin and the fat sit in the oven for a full 10 minutes. I mean it—a full 10 minutes! You are waiting for that oil to be sizzling and just starting to smoke. If it’s not shimmering and smoking slightly when you pull it out, your puddings will be flat little pancakes. Seriously, being brave with the heat is the biggest secret to achieving that massive rise.

Baking your yorkshire pudding Without Opening the Door
Once that fat is smoking, you have to work quickly! Pull the tin out carefully, and immediately start pouring your batter evenly into the holes, filling them about halfway up. Don’t dawdle! Get that tin straight back into that scorching-hot oven.
Now comes the hardest part for impatient cooks: you absolutely cannot open the oven door for a minimum of 20 minutes. If you check too soon, the rush of cool air will collapse the rising structure, and poof! Gone are your **Fluffy Yorkshire Puddings**. Let them bake untouched. After 20 minutes, you can peek, but aim for 25 minutes total, until they are deeply golden brown all over and look beautifully crisp and rigid. Serve them right away, screaming hot!
Tips and Tricks for the Best yorkshire Pudding Every Time
Okay, so you’ve mastered the batter resting and the smoking hot fat—that’s huge progress, by the way! But if you want to move from ‘good’ puddings to truly show-stopping **Traditional British Side Dish** quality, there are a few extra little things I swear by. These are the things my mum showed me that took the recipe from decent to legendary territory. They don’t take any extra time, really, just remembering a couple of details.
First, let’s talk batch size for a minute. For my regular Sunday dinners, I almost always stick to a standard 12-hole muffin tin. The small ones seem to trap that heat better, which encourages that big, dramatic rise. If you’re making massive puddings for, say, a special event, you can use a deep roasting pan, but you *must* increase the cooking time by about 10 minutes, and you’ll need even more dripping in the bottom to ensure the sides cook evenly.
And I need to stress the ingredient temperature again because I just see people making that mistake all the time. If you’re mixing your batter right before you plan to cook, that’s cool, but make sure your refrigerated milk has sat out for at least 20 minutes and your eggs aren’t straight from an ice-cold fridge. Cold ingredients fight the hot oil, and fighting is exactly what we don’t want when we need a big, fluffy push!
One last thing that I think really elevates the flavor, especially if you’re not using beef dripping? A tiny pinch of paprika in the dry ingredients. Not enough to taste spicy, good heavens no, but just enough to give them that extra gorgeous, deep golden coloring you see in magazines. It’s a small cheat, but one I use constantly when I’m serving a one-pan pork tenderloin like my favorite pork dish.
Serving Suggestions for your yorkshire pudding
So, you’ve successfully created golden, towering miracles! Now for the fun part: eating them! The **yorkshire pudding** really shines brightest as the ultimate **Roast Dinner Accompaniment**. It just feels fundamentally wrong to have a proper Sunday roast without them, doesn’t it?
Of course, the classic pairing is an absolutely stunning joint of roast beef. That beautiful, savory gravy needs a hearty, crisp pocket to soak it all up, and nothing does that job better than a high-risen Yorkie. We usually make these for every Sunday roast, whether it’s beef, lamb, or chicken.
But don’t feel boxed in! They are also fantastic even when the meal isn’t strictly traditional roast fare. I’ve served them alongside my slow cooker BBQ pulled pork just because I made a double batch and needed to use them up. Honestly, anything that benefits from a massive ladle of gravy is perfect for these. If you’re planning on making pulled pork soon, you have to try the flavor combination in my slow cooker recipe—it’s a game-changer!
My two big serving rules are simple: Serve them immediately while they are piping hot and crisp, and make sure everyone gets plenty of gravy! They lose their magic quickly if they sit around growing soft, so get them straight onto the plate!
Storage and Reheating yorkshire Puddings
Life happens, and sometimes you just can’t eat 12 perfectly puffed puddings in one sitting, even if you try your absolute hardest! These are definitely best eaten fresh, but if you do have leftovers, don’t just throw them in the fridge and let them turn to lead. We need a recovery plan to bring back that glorious crispness.
If you have any leftover **yorkshire pudding** after the dinner rush, the first thing you must do is let them cool down completely to room temperature. Don’t put warm things into plastic containers! Once they are cool, slide them into an airtight container. They will keep okay in the fridge for about two days maximum, but honestly, they start getting a little sad after day one.
Now, for the all-important reheating. Listen to me carefully: Do NOT use the microwave. I repeat, DO NOT use the microwave. A microwave will steam the puddings, and they will go soggy faster than you can say ‘gravy boat.’ That defeats the entire purpose of chasing that high-rise, crispy exterior!
The way to resurrect them is back in the oven. Heat your oven up to about 200C (400F). Place the cold puddings directly onto a wire rack—don’t put them on a baking sheet completely, as you want air circulating underneath them too. Let them bake for about 5 to 7 minutes. You’ll notice they start firming up first, and then that beautiful color returns. Pull them out when they feel firm and light again, and they’ll be almost as good as fresh!
Addressing Common yorkshire pudding Failures
It wouldn’t be a proper journey into traditional cooking unless we talked about what goes wrong! Trust me, I’ve made every single mistake in the book when it comes to **yorkshire Pudding Tips and Tricks**. Before you start thinking this recipe is cursed, nine times out of ten, the failure comes down to one of three things: temperature, resting, or opening the door too soon. Let’s troubleshoot so you don’t waste those lovely eggs!
So, what’s your disaster? A flat pancake? A pudding that rose beautifully then just collapsed into a dense, oily shell? Or maybe they look fine, but they’re pale and don’t have that deep, golden crust? We’ve got a fix for all of them.
If your puddings are flat, 99% of the time it means your fat wasn’t hot enough. It needs to be smoking hot! If the oil isn’t hot enough to create an immediate sizzle when the batter hits it, you won’t get that explosive steam reaction needed for lift. Go back, preheat that tin longer! Also, if you accidentally used a chilly batter, that cooling effect can stop the rise dead in its tracks.
If your puddings are dense and chewy, you likely overworked the batter. Did you whisk it furiously for five minutes straight? Stop that! Once the flour is incorporated with the eggs and milk, you just need smooth consistency—that’s it. Over-whisking develops too much gluten, and you end up with something closer to an undercooked bagel than a fluffy pudding.
Finally, being pale usually points to an underheated oven. Make sure you let the oven come up to temperature, don’t just rely on the light going off. The ambient oven temperature needs to be high (220C!) to create that deep golden color required for a truly crispy shell. Remember, if you’re serving these with one of my fantastic roast recipes, they need to look the part too!
Variations on the Classic yorkshire pudding
Now, I’m a stickler for tradition, as you can probably tell—I think the classic recipe is best for a proper roast. But I know the culinary world moves on, and sometimes we need to adapt! It’s great, though, because the basic structure of a **yorkshire pudding** is quite forgiving if you handle the temperature right.
The easiest variation is just changing the container size. I focus heavily on making **Individual Yorkshire Puddings** in a muffin tin for the best lift, but if you’re making them for kids or for a big buffet, you could absolutely make one giant pudding in a deep baking dish. Just remember what I said: it needs more time in that hot oven because the center takes forever to cook through.
I’ve also had a few requests lately about making these for friends who can’t eat wheat. Yes, you can absolutely make a **Gluten Free Yorkshire Pudding**! The key is getting a blend that mimics the structure of plain flour. You can use a quality 1-to-1 GF blend in place of the all-purpose flour.
However, and this is important: GF flour sometimes absorbs liquid differently, so you might need to let that batter rest even longer—maybe an hour instead of 30 minutes—to ensure the starches hydrate fully. If you’re exploring other GF baking adventures, I have a fantastic recipe for gluten-free zucchini muffins that travels really well!
Beyond that, people get wild! Some folks add herbs like thyme or chives to the batter, which is lovely if you are serving something like chicken instead of beef. Just make sure if you add heavy solids, you stick to that resting rule religiously so the flour has time to swell around those additions!
Frequently Asked Questions About yorkshire Pudding
Can I make yorkshire pudding batter ahead of time?
Oh yes, you absolutely can, and honestly, it helps! While the minimum rest time is 30 minutes on the counter, chilling the batter overnight—or even up to 24 hours—is fantastic for developing flavor and structure. Think of it this way: the resting time allows the starch in the flour to fully hydrate. If you are making these for a big brunch or holiday where you need everything ready, mix the batter the night before, cover it tightly, and pop it in the fridge. Just remember to take it out about 30 minutes before frying so it loses that deep chill before hitting the smoking fat!
What is the difference between yorkshire pudding and popovers?
That is a great question that comes up a lot! In terms of the basic batter structure—flour, eggs, milk—they are incredibly similar, which is why many people confuse them. Popovers are essentially the American cousin. The main difference, to me, comes down to richness and flavor, which ties back to the fat. Popovers are usually baked in specialized, lighter tins with melted butter, giving them a lighter rise and often a less aggressively savory flavor. A proper **yorkshire pudding**, however, demands beef dripping or a very high-smoke point vegetable oil that gets screaming hot, lending that signature, slightly richer taste we Brits love alongside our roast dinners.
Is beef dripping necessary for the Best Yorkshire Pudding?
Necessary? No. Flavorful? Absolutely, 100%! If you are aiming for that true, deep, traditional British flavor profile that perfectly complements roast beef, then yes, beef dripping is the way to go for the **Best Yorkshire Pudding**. It adds a savory depth you just can’t replicate with plain oil.
However, if you’re vegetarian, or you simply can’t find dripping, using a flavorless, high-smoke-point oil like sunflower or vegetable oil works perfectly fine for achieving the height and crispiness factor. You just miss that slight meaty undertone. If I’m using oil, sometimes I add a tiny pinch of smoked salt to the dry ingredients to try and mimic that depth. If you’re looking for more great flavor boosters for your side dishes, you can read my thoughts over on the About Us page!
PrintThe Perfect Foolproof Yorkshire Pudding

A reliable recipe for classic British Yorkshire puddings, resulting in a crispy exterior and a light, airy center, ideal for serving with roast dinners.
- Prep Time: 10 min
- Cook Time: 25 min
- Total Time: 35 min
- Yield: 12 small puddings
- Category: Side Dish
- Method: Baking
- Cuisine: British
- Diet: Vegetarian
Ingredients
- 140g plain (all-purpose) flour
- 4 large eggs
- 200ml milk (whole milk works best)
- Pinch of salt
- Vegetable oil or beef dripping, for cooking
Instructions
- Sift the flour and salt into a large bowl. Make a well in the center.
- Crack the eggs into the well. Begin whisking the eggs slowly, gradually incorporating the flour from the sides.
- Slowly pour in the milk while continuously whisking until you have a smooth, thin batter, similar in consistency to single cream. Do not over-whisk.
- Cover the bowl and let the batter rest at room temperature for at least 30 minutes, or chill for several hours. Resting improves the rise.
- Preheat your oven to 220C (425F/Gas Mark 7). Place a 12-hole muffin tin or a deep roasting tin into the oven. Add about 1 teaspoon of oil or dripping into each hole. Heat the oil until it is smoking hot, about 10 minutes.
- Carefully remove the hot tin from the oven. Quickly and evenly pour the batter into the hot oil, filling each hole about halfway.
- Immediately return the tin to the oven. Do not open the oven door for at least 20 minutes while the puddings are rising.
- Bake for 20 to 25 minutes, or until the puddings are well risen, deep golden brown, and crisp. Serve immediately.
Notes
- Use very hot fat. This is the most important step for a good rise.
- Ensure your oven temperature is high enough before putting the batter in.
- Do not use cold ingredients; let the eggs and milk come to room temperature before mixing.
- For individual puddings, use a 12-hole muffin tin. For larger puddings, use a deep roasting pan.
Nutrition
- Serving Size: 1 pudding
- Calories: 150
- Sugar: 2
- Sodium: 120
- Fat: 8
- Saturated Fat: 2
- Unsaturated Fat: 6
- Trans Fat: 0
- Carbohydrates: 15
- Fiber: 1
- Protein: 6
- Cholesterol: 75