


Let’s be honest, mornings are chaos, right? I developed this recipe because I swear, every healthy bran muffin recipe out there ends up tasting like cardboard after the first day. Nobody needs that! What I needed was a truly satisfying, high-fiber breakfast that actually tasted good—moist, fluffy, and just sweet enough. So, I spent way too much time figuring out the perfect ratios for my signature honey bran muffins. I’ve been baking breakfast goods for years, and the secret to keeping bran from sucking all the moisture out is using buttermilk and just enough oil. Trust me, these are the muffins that actually stay soft for days. If you’re looking for easy, click here to see more of my go-to breakfast hacks!
Why These Honey Bran Muffins Are Your New Favorite High Fiber Breakfast
Seriously, these aren’t your grandma’s dry, chalky bran muffins—unless your grandma was a secret baking genius! These hit every mark:
- They are unbelievably moist thanks to the buttermilk and honey combo. Say goodbye to dry muffins!
- Packed with fiber from the wheat bran, making them a genuinely sustaining meal prep staple.
- You’re looking at maybe 10 minutes of prep work before the oven does the heavy lifting.
- They freeze like a dream, so you always have a wholesome bite ready when you dash out the door.

Essential Ingredients for Perfect Honey Bran Muffins
You have to respect the ingredients when you’re making something healthy that still tastes like a treat. The list is simple, which is part of why this is such an easy muffin recipe. It’s about quality over quantity here.
First, the dry team: we need 1 1/2 cups of whole wheat flour for body, 1 whole cup of wheat bran—don’t skimp on that, that’s where the good stuff is! Then, our leavening agents: 1 teaspoon of baking soda and just a half teaspoon of salt. Oh, and a tiny whisper of cinnamon to warm things up.
Now for the wet side, and this is vital for tenderness! We’re using a full cup of buttermilk. That small amount of acid works magic with the baking soda to give you those light, not-dense muffins. You’ll also need a half cup of sticky, glorious honey, that quarter cup of vegetable oil, and one large egg to hold it all together. If you’re feeling extra, toss in a half cup of raisins, but only if you soak them first!
If you want to see how I treat buttermilk in other recipes, check out my fluffy buttermilk pancakes guide. It really shows you how that dairy product adds incredible lift!
Step-by-Step Guide to Making Honey Bran Muffins
Making these means you can have a fantastic, healthy breakfast ready fast—seriously, the total time is under half an hour! If you’re looking for an easy muffin recipe that delivers wholesome flavor, follow these steps precisely. Remember, bran drinks up moisture, so we keep the mixing quick!
- First things first, fire up your oven! Get it hot to 400 degrees F (that’s 200 degrees C). While it’s heating, line your 12-cup muffin tin with paper liners or just give it a good, thorough greasing.
- Next, grab your biggest bowl. This is where the dry stuff goes. Whisk that whole wheat flour, the wheat bran, baking soda, salt, and cinnamon together until they look totally uniform.
- In a separate, medium bowl—don’t skip separating them!—you’ll mix up your wet ingredients. Pour in the buttermilk, drizzle in the honey, add the oil, and drop in that one egg. Just whisk them until they look settled and combined.
- Now for the magic combination! Pour the wet ingredients right into the dry ingredients. And here is my biggest tip: Stir *just* until you see no more white streaks of flour. If you’re adding those optional raisins, fold them in gently right at the end.
- Spoon that batter evenly into your prepared cups—you want them about two-thirds full.
- Bake them for about 15 to 18 minutes. You’ll know they’re done when a toothpick stuck right in the middle pops out clean.
- Let them hang out in the tin for only a few minutes—like five tops—before moving them to a wire rack to finish cooling down completely.
Preparing the Dry and Wet Mixtures
It’s all about organization early on. Whisking the dry ingredients well is crucial because you need that baking soda and cinnamon evenly distributed throughout the bran and flour. If they clump, you get weird pockets in your muffin!
For the wet side, just a quick whisk is enough to blend the honey into the buttermilk and oil. We don’t want to whip air in there! We want the acid from the buttermilk to do the lifting, not frantic stirring with the mixer.
Combining Batter and Baking Your Honey Bran Muffins
Listen, this is the step where beginners mess up muffins every single time. When you pour the wet into the dry, grab a spatula and fold gently. You are looking for *just combined*. If you mix until it’s perfectly smooth, you’re developing gluten in that whole wheat flour, and that equals tough, chewy muffins!
We are aiming for tender texture here, so don’t be afraid if you see a few tiny lumps of flour left when you stop stirring. Fill those cups only two-thirds full to ensure they dome nicely without spilling over the tin edges as they bake up high at 400 degrees.
Tips for Success with Buttermilk Muffins
I’ve tried pretty much every single mistake possible when making bran muffins over the years, so let me save you some heartache! The biggest baking sin we commit here is one you’ve already heard about: overmixing. Remember that rule? If you stir until it’s totally smooth, you lose all that incredible, soft texture we’re fighting for.
Bran is thirsty, and the quick, gentle mixing keeps everything light. That, combined with the buttermilk, guarantees you get those springy, tender bites. People see buttermilk and get nervous because they don’t always have it on hand, but don’t let that stop you! I have a total workaround in the notes that saves the day if a carton isn’t in your fridge.
I really want you to trust the process here, especially on the mixing step. It’s the difference between a fantastic, healthy snack and something you dread eating!
Ingredient Adjustments for Sweetness and Texture
If you find that you like your honey bran muffins a little bit sweeter—maybe you’re trying to convince a picky kid to eat them—you can totally add a little boost! My tip is to sneak in an extra 1/4 cup of dark brown sugar right into your dry ingredients. That molasses kick pairs beautifully with the honey.
Now, about the buttermilk swap business. If you’re out, you can substitute plain yogurt, and I’ve tested this repeatedly. The best way to do it is to take 1 cup of plain yogurt—full fat tastes best here—and stir in about 1 teaspoon of lemon juice or vinegar. Let it sit on the counter for about five minutes to curdle slightly.
That mixture acts just like buttermilk would when reacting with the baking soda. If you want to check out my guide specifically on using yogurt in baking, I cover it in depth over here. It’s a game-changer for keeping things moist!
Making Meal Prep Muffins: Storage and Freezing Instructions
Alright, if you’re like me, you want to bake once and eat healthy for the whole week! That’s why these are perfect **meal prep muffins**. The good news is that because we used buttermilk and oil instead of applesauce or yogurt (which can get weird faster), these whole grain muffins hold up beautifully.
At room temperature, store them in an airtight container—I mean truly sealed tight. They stay perfectly good for about three days. After that, I notice they start losing that fresh-baked springiness, and we can’t have that, can we?
For true marathon meal prepping, freezing is your best friend. Once they are completely cool—and I mean stone-cold, don’t wrap them warm or you’ll have condensation disaster—wrap each individual muffin tightly in plastic wrap. After they’re individually wrapped, toss them all into a big freezer-safe bag. They keep great for up to three months!
When you need one for your **breakfast on the go**, just pull one out the night before and let it thaw on the counter, or pop it straight from the freezer into your toaster oven for about five minutes. They taste almost brand new!
If you’re looking for more make-ahead ideas, you have to check out my no-bake trail mix granola bars. They travel just as well!
Variations for Your Honey Bran Muffins
The base recipe for these honey bran muffins is phenomenal as is, but sometimes you just need a little something extra, right? Since we already established this recipe is perfect for a high fiber breakfast, we can load it up with some fun additions without worrying too much about texture.
If you’re kicking the raisins to the curb (I get it, some people aren’t raisin fans!), definitely swap them out for dried cranberries. The tartness of the cranberry cuts through the sweetness of the honey so nicely. Because the bran is already working so hard to keep things moist, you can handle a half cup of dried fruit easily.
You also have the option to add some crunch! Chopped walnuts or pecans work wonderfully in here. Just toast them lightly in a dry pan for five minutes before chopping and folding them in—it wakes up their flavor! If you’re making these for kids, maybe skip the nuts, but for us adults, a little crunch is necessary.
Finally, if you want to lean into that warm, cozy spice profile even more, try adding just 1/4 teaspoon of ground nutmeg along with your cinnamon in the dry ingredients. It adds just a subtle, warming complexity that makes these taste like true honey sweetened baking perfection!
Serving Suggestions for Breakfast on the Go
These **honey bran muffins** are truly designed for speed! They’re sturdy enough that you don’t need a plate or a fork if you’re grabbing them on your way out the door. That fiber content means they’re going to keep you full until lunchtime, which is exactly what I want from my **breakfast on the go** staples.
The sweetness from the honey and the slight tang from the buttermilk mean they don’t need much adornment, but here are a few ways I love serving them or prepping them for easy eating:
- The Classic Spread: If you have 30 extra seconds, splitting a warm muffin and spreading a thin layer of cream cheese is pure bliss. It just melts right into the crumb.
- Coffee Companion: They are absolutely perfect alongside a strong cup of coffee or tea. The mild cinnamon note plays so nicely with a dark roast.
- Fruit on the Side: Since these are already wholesome, I usually grab a banana or a handful of baby carrots—yes, carrots!—to eat alongside it for extra vitamins when I’m running out the door.
If you want another quick, healthy companion snack for those busy mornings, you should check out my recipe for homemade granola clusters. They go great sprinkled on yogurt or just eaten by the handful!
Frequently Asked Questions About Healthy Bran Muffins
I know you probably have a few questions before diving into your first batch. Bran can be tricky if you haven’t worked with it much, but honestly, these are so forgiving! I’ve answered the ones I get asked most often about making these perfect **healthy bran muffins**.
Can I use maple syrup instead of honey for honey sweetened baking?
Yes, absolutely, you can use maple syrup! I love the flavor of honey here, but maple syrup makes a wonderful substitute for that touch of sweetness. Just make sure you use the same measurement—a half cup. The one thing to know is that maple syrup is slightly thinner than honey, so you *might* end up with a slightly looser batter initially.
Because of that slight difference in viscosity, your muffins might bake up just a hair taller, but honestly, the texture difference is negligible. You still get that fantastic flavor profile important for good honey sweetened baking. Don’t worry about changing anything else in the recipe!
How much fiber is in these whole grain muffins?
That’s the whole point of using wheat bran, right? We want that high fiber boost! According to my calculations for this recipe, one single muffin gives you about 4 grams of fiber. That’s quite a punch for a quick bite!
Remember, that number comes primarily from the full cup of wheat bran we add, combined with the whole wheat flour. It helps make these the perfect slow-burning fuel for your morning. If you’re trying to sneak more veggies into the kids, you can always try my recipe for fruit and veggie gummies as another hidden health hack!
Are these technically kid friendly muffins?
I’d say yes, they are definitely on the friendly side of healthy! A lot of kids turn their noses up at bran, but because we use honey instead of molasses or plain sugar, they taste naturally sweet. Plus, since they are so incredibly moist, they don’t have that dry crumb that kids usually associate with “healthy” baked goods.
If your kids are ultra-sensitive to texture, you can follow my tip from earlier: fold in the raisins gently, or swap them out entirely for mini chocolate chips. A little chocolate makes everything more appealing, even a slightly **whole grain muffin**!
Nutritional Snapshot of This Recipe
Okay, so here’s the scoop on what you’re putting into your body when you grab one of these gorgeous **honey bran muffins**. I always have to look at the bigger picture, right? We want wholesome, and I think this recipe delivers!
Based strictly on the ingredient amounts listed, here’s a rough rundown per muffin. Remember, my kitchen scales and brand choices might be slightly different than yours, so take this as a great general guide. Baking is science, but ingredients are variable!
- Serving Size: 1 muffin
- Calories: 190
- Sugar: 14g (mostly from the honey!)
- Fat: 7g
- Carbohydrates: 31g
- Fiber: 4g (Hello, gut health!)
- Protein: 5g
It’s a fantastic combination of fiber and natural sweetness to keep you going. If you want more detail about how I approach nutritional labeling on my site, you can always check out my full disclaimer page here. Happy baking, everyone!
PrintHoney Bran Muffins
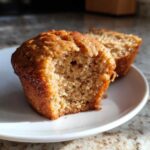
Make moist, high-fiber muffins sweetened naturally with honey. These are good for a quick breakfast or snack.
- Prep Time: 10 min
- Cook Time: 18 min
- Total Time: 28 min
- Yield: 12 muffins
- Category: Breakfast
- Method: Baking
- Cuisine: American
- Diet: Vegetarian
Ingredients
- 1 1/2 cups whole wheat flour
- 1 cup wheat bran
- 1 teaspoon baking soda
- 1/2 teaspoon salt
- 1/2 teaspoon ground cinnamon
- 1 cup buttermilk
- 1/2 cup honey
- 1/4 cup vegetable oil
- 1 large egg
- 1/2 cup raisins (optional)
Instructions
- Preheat your oven to 400 degrees F (200 degrees C). Line a 12-cup muffin tin with paper liners or grease it well.
- In a large bowl, whisk together the flour, wheat bran, baking soda, salt, and cinnamon.
- In a separate medium bowl, mix the buttermilk, honey, oil, and egg until combined.
- Pour the wet ingredients into the dry ingredients. Stir just until combined; do not overmix. If using, fold in the raisins.
- Divide the batter evenly among the muffin cups, filling each about two-thirds full.
- Bake for 15 to 18 minutes, or until a toothpick inserted into the center comes out clean.
- Let the muffins cool in the pan for a few minutes before transferring them to a wire rack to cool completely.
Notes
- For a sweeter muffin, add 1/4 cup of brown sugar to the dry ingredients.
- You can substitute plain yogurt for the buttermilk if needed; add 1 teaspoon of lemon juice to the yogurt and let it sit for 5 minutes before using.
- Store cooled muffins in an airtight container at room temperature for up to 3 days, or freeze them for longer storage.
Nutrition
- Serving Size: 1 muffin
- Calories: 190
- Sugar: 14g
- Sodium: 180mg
- Fat: 7g
- Saturated Fat: 1g
- Unsaturated Fat: 6g
- Trans Fat: 0g
- Carbohydrates: 31g
- Fiber: 4g
- Protein: 5g
- Cholesterol: 25mg