

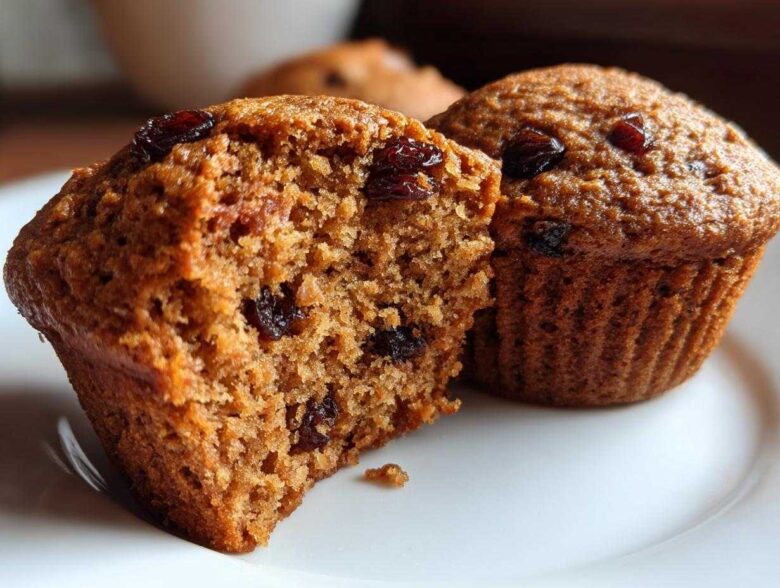
Oh, breakfast struggles are real, aren’t they? I swear, for years, every “healthy” muffin recipe I tried resulted in something that tasted like cardboard pretending to be cake. You want fiber, you want wholesome whole wheat ingredients, but you absolutely deserve something soft, something that doesn’t make you immediately reach for a glass of juice just to swallow it. That’s why I spent ages fiddling with soaking times and liquid ratios to nail this ultimate recipe for **bran muffins**. Trust me, these are hands-down the best. They come out incredibly moist and packed with fiber, turning a boring morning routine into something truly delicious.
I tried everything—adding applesauce, swapping oils, using honey—but the secret really lies in how we treat that wheat bran first. If you’re looking for a fantastic grab-and-go breakfast that actually tastes good, you’ve found your keeper. Let’s get started!
Why These Bran Muffins Are Your New Favorite Healthy Breakfast Muffins
I know, I know, everyone promises “moist” and “healthy,” but these bran muffins actually deliver! We focused on a few key things here to make sure you get a wholesome breakfast staple that doesn’t dry out in the fridge. Unlike those sad little bricks you get at the coffee shop, mine are reliably good every single time.
These are honestly the **best bran muffins** because they hit all the important notes:
- They use simple, wholesome ingredients you likely already have.
- They bake up quickly—less than 20 minutes in the oven!
- The texture is fantastic; they are soft enough for every member of the family.
I’ve put tons of effort into perfecting the hydration levels. If you’re ready to stop settling for dusty toast, this is your recipe!
Achieving Superior Moisture in Your Moist Bran Muffins
The key to avoiding that gritty texture lies in two places, really. First, we pre-soak the bran in boiling water. Seriously, don’t skip that 10 minutes; it plumps those little flakes right up! Second, the buttermilk and oil do heavy lifting here, adding moisture right into the crumb structure. My biggest piece of advice? Once you add the dry stuff, just stir until you barely see flour streaks left. Overmixing develops the gluten and that’s how you get tough muffins. We want tender muffins!
The High Fiber Muffins Advantage for Digestive Health
We’re not just throwing wheat bran in here for looks, right? This is the whole point! These **high fiber muffins** pack a serious punch, making them perfect for keeping you full until lunchtime. It’s satisfying knowing that this **grab and go breakfast** is genuinely helping you stay on track. Because we use whole wheat flour along with the bran, you get complex carbs that release energy slowly. They are so much better than the boxed cereals—and they taste like a treat!
If you’re looking for other easy breakfasts you can prep ahead, check out my favorite no-bake trail mix granola bars sometime. They freeze beautifully too!
Gathering Ingredients for Perfect Bran Muffins
Alright, let’s talk about what you need to pull these off. When it comes to **bran muffins**, the prep might seem simple, but precision matters, especially when we are aiming for that ultimate texture. I’ve listed out exactly what I use below. Don’t just eyeball the measuring cups here; this is where the magic starts to happen!
You’ll notice we use buttermilk—that slight acidity works wonders reacting with the baking soda and helps tenderize the whole wheat flour. If you don’t have buttermilk, don’t panic! I have a super easy fix for that, which we’ll cover in the tips below. When you’re making **homemade bran muffins**, having exactly what you need ready makes the mixing process a breeze. If you’re looking for other simple recipes for wholesome breakfasts, my granola clusters are always a hit!
Ingredient Notes and Substitutions for Your Bran Muffins Recipe
This **bran muffins recipe** works because of the balance, but I totally get that sometimes you’re missing one thing or just want to tweak it for your taste buds. So, here are the important notes:
- Sweetener Swap: If you’re avoiding brown sugar, you can absolutely swap it for maple syrup! I find you only need about 1/3 cup of syrup to get that nice natural sweetness without making the batter too thin.
- Oat Bran Addition: Want even more heartiness? Feel free to swap out half (1/2 cup) of the regular wheat bran for oat bran. It just makes the finished product a little chewier, which some folks love!
- Raisins: Totally optional, but if you forget to soak them, don’t worry! Since the batter is quite moist already, dry raisins will hydrate nicely in the oven.
These small tweaks let you customize your **classic bakery muffins** while keeping that core moist texture that makes this recipe famous.

Step-by-Step Instructions for Making Moist Bran Muffins
Alright, here is where we put it all together! These **easy muffin recipes** are about timing—not complexity. If you have your ingredients measured out, this goes together faster than you can believe. Remember, the goal is speed and gentleness during the mixing phases to lock in that moisture we worked so hard to create!
The very first thing you absolutely must do is get your oven cranked up! We need that 400-degree heat to give these muffins the lift they need right away. Make sure you have your 12-cup tin ready with liners or a good grease-and-flour treatment. If you love how my zucchini bread comes out, you know prepping the pan right is half the battle!
Preparing the Bran Soak and Wet Mixture for Your Bran Muffins
This hydration step is non-negotiable for the best texture. Seriously, don’t rush it! Pour that cup of boiling water over the wheat bran in your mixing bowl. Now, set a timer for exactly 10 minutes. During this time, the bran absorbs all that harshness and softens up perfectly. It swells beautifully, and that is the secret sauce for preventing dry muffins.
Once those 10 minutes are up, we toss in the rest of the wet stuff: buttermilk, egg, that lovely brown sugar, the oil, and vanilla. Give this a quick whisk just until everything looks incorporated. It’s going to look a little thick and textured—that’s exactly what you want before we introduce the dry ingredients. Remember, just mix until combined here, no need to beat it into submission!
Combining and Baking These High Fiber Muffins
In a separate bowl—your easiest clean-up tip!—whisk together your whole wheat flour, baking soda, and salt. Now, gently dump the dry bowl into the wet bowl. Here is the part where you need a gentle hand! Fold them together slowly, maybe 10 to 12 strokes total. Stop mixing the absolute second you don’t see white streaks of flour anymore. If you decide to add those optional raisins, fold those in now, too. Overmixing **bran muffins** is the quickest way to a tough result!
Divide the batter evenly. I aim to fill each cup about two-thirds full. That gives them room to dome nicely without spilling over. Back to the hot oven they go! Bake them for 15 to 18 minutes at that 400°F. You know they’re done when a toothpick slides in and comes out clean. A little moisture clinging to the toothpick is okay, but no wet batter!
Tips for Success When Baking Classic Bakery Muffins
You know how sometimes you bake something at home, and it just looks… sad? Mine used to look like that before I figured out these tiny tricks that bakers use to get that beautiful, professional dome on their goods. These **classic bakery muffins** are no exception—a few small adjustments make all the difference in texture and appearance.
Here are my top secrets for making sure these **bran muffins** turn out perfectly every time:
- Room Temperature Buttermilk: This seems fussy, but it’s important! When your buttermilk is cooler, it chills the batter slightly, which can slow down the immediate reaction with the baking soda. I always take mine out 20 minutes before I start. It helps everything emulsify smoothly.
- Don’t Peek! Resist opening the oven door, especially in the first 10 minutes of baking. That blast of cool air drops the temperature when the muffins are busy rising, and they might deflate in the middle. We want them tall and proud!
- Use Fresh Leavening Agents: Since this recipe already relies on natural moisture, we need our baking soda to be punchy! If your baking soda has been hanging out in the back of the cupboard for years, toss it and grab a new container. Old leavening agents equal flat muffins, and no amount of buttermilk can fix that.
If you love learning little secrets about baking that gives you that professional look, you absolutely have to check out my recipe for fluffy buttermilk pancakes sometime. The buttermilk trick is the star there, too!
Storing and Freezing Your Homemade Bran Muffins
Okay, this is what makes these muffins truly revolutionary for busy people like us: they are amazing make-aheads! I absolutely love baking a double batch of these **bran muffins** on a lazy Sunday so I have healthy options ready for the entire work week. But you can’t just throw warm muffins into a plastic bag; that guarantees mushy bottoms and disaster.
The secret to long-lasting, delicious muffins is total air-drying first. After they come out of the pan and cool on the rack for about 15 minutes, you need to let them cool completely to room temperature. I mean, you can touch them, they no longer feel warm whatsoever. This step ensures no condensation builds up, keeping the texture perfect.
Once they are totally cool, you have options! If you plan to eat them within three days, just pop them into a large zip-top bag or an airtight container at room temperature. They stay wonderfully soft for days, which is excellent.
Making These Freezer Friendly Muffins
When I’m making a big batch, freezing is the way to go. These are fantastic **freezer friendly muffins**! Here is my exact process:
- Cool them completely on a wire rack—I usually leave them out for an hour just to be safe.
- Wrap each individual muffin tightly in a small piece of plastic wrap. Think of it like giving each one its own cozy little blanket.
- Toss those wrapped muffins into a large, heavy-duty freezer bag, making sure to press out as much air as possible before sealing.
They last beautifully for up to three months this way, and they are so easy to thaw for a **grab and go breakfast**. You can thaw a few the night before on the counter, or, if you’re in a real hurry, microwave one or two on a paper towel for about 15 to 20 seconds. They come out tasting freshly baked! For quick snacking later, I always have some granola bars ready too, but nothing beats grabbing one of these warm, soft muffins!
Serving Suggestions for Your Bran Muffins
I love that these **bran muffins** are such a perfect, sturdy base, because they taste wonderful just as they are, but they also hold up beautifully to toppings without getting soggy. When I’m rushing out the door, they are my go-to **grab and go breakfast**. You don’t need much, but a little something extra can make eating them feel less like a chore and more like a treat!
Here are a few simple ways I love to dress up my batch when I have an extra minute in the morning:
- The Classic Butter Spread: If you toast one lightly—just for about 30 seconds in the toaster oven—the inside warms up perfectly, and a thin smear of salted butter melts right into those porous, moist crumb pockets. Perfection!
- Cream Cheese Magic: For a richer morning, a slather of whipped cream cheese is divine. If you have any chives or herbs laying around, a tiny sprinkle of seasoned salt on top turns it savory-ish. Yes, even with the brown sugar, this is surprisingly good!
- Nut Butter Boost: Since these are already **high fiber muffins**, adding a scoop of almond butter or peanut butter gives you a serious protein boost that keeps you full for hours.
- A Little Something Sweet: If you need that extra bit of flavor, I sometimes warm up a tablespoon of honey or maple syrup and drizzle it lightly over the top of the muffin right before eating. It’s like a tiny syrup bath!
Honestly, even eating them plain while reading emails totally counts, but changing up the topping keeps things exciting all week long. If you’re looking for something heartier for dinner later, check out the maple glaze on my sheet pan salmon recipe—it might inspire some sweet and savory mixing in your snacks!
Frequently Asked Questions About Bran Muffins
I always get so many questions popping up after people try this recipe for the first time! It’s great because it means people are actually making them! Most of the things parents and bakers ask me revolve around substitutions or getting that perfect texture just right. I’ve gathered the top three things I hear asked most often about these **homemade bran muffins** right here, so you can jump straight to baking!
Can I make these Oat Bran Muffins Idea instead of using wheat bran?
Oh yes, you absolutely can incorporate oat bran! It’s a fantastic idea. If you look back at my ingredient notes—if you missed them, go check the ingredient section—I mention you can substitute half of the wheat bran (so half a cup) with oat bran. If you want to go full oat bran muffins idea, I’d recommend doing a 50/50 split.
Now, just a heads up: oat bran absorbs liquid differently than wheat bran. It tends to create a slightly softer, maybe even a tiny bit sticker, texture. If you swap out *all* the wheat bran for oat bran, you might need to add an extra tablespoon or two of buttermilk just to keep the batter where it needs to be. It’s a minor adjustment, but it means your **moist bran muffins** stay moist!
How do I make these Naturally Sweetened Muffins without brown sugar?
This is a question I get all the time, especially when people are trying to keep their **healthy breakfast muffins** as clean as possible. The goal is deliciousness, and frankly, sugar is usually our friend when baking, but we can definitely pivot!
As I mentioned when we looked at the ingredient swaps, maple syrup is my favorite direct replacement. You can swap the 1/2 cup of brown sugar for about 1/3 cup of pure maple syrup. Since maple syrup is thinner than packed brown sugar, we reduce the amount slightly. This keeps them wonderfully **naturally sweetened muffins**!
Another trick you could try, especially if you have some overripe bananas sitting on the counter, is to use 1/2 cup of mashed banana instead of the brown sugar. Bananas add sweetness *and* a ton of moisture, which is always a win for **moist bran muffins**. Just be aware that banana flavor will definitely come through!
What is the difference between these and standard Wheat Bran Recipes?
That’s a great point! Commercial **wheat bran recipes** often rely heavily on white sugar or white flour to balance out the hearty, almost bitter taste that bran can sometimes have. My recipe leans into whole wheat flour, which is denser, and uses just enough brown sugar—and that essential buttermilk soak—to make sure the flavor profile is rich, not rough.
Honestly, the biggest difference for these **bran muffins** compared to others is the soaking process. Most quick recipes just throw everything in together. But by letting that bran sit in the boiling water, we pre-soften all those tough flakes. That soaking step is what guarantees that soft, tender bite you want in a **classic bakery muffin**, instead of something chewy or sandy.
Before you hop off to bake, take a peek at my About Us page if you want to know more about how I test recipes like this one to ensure they are perfect for your family!
Nutritional Estimate for These Bran Muffins
Now, I always want to be totally upfront with you—these numbers are estimates, okay? I use a pretty standard calculator based on the precise ingredients listed in the recipe, but what you use matters! If you swap the oil for applesauce or use a different brand of buttermilk, things shift a little. But this gives you a really solid idea of what you’re biting into when you enjoy these as part of your **healthy breakfast** routine.
The best part, in my opinion, is the fiber content. For something that tastes this good, getting 5 grams of fiber in one muffin is a huge win! It really confirms that these are genuinely good for you, aside from just tasting fantastic. We aren’t aiming for diet food here, we are aiming for *real food* that nourishes you:
- Serving Size: 1 muffin (Makes 12 total)
- Calories: About 180 per muffin
- Total Fat: Around 6g (We use oil, but it’s necessary for that moisture!)
- Carbohydrates: Approximately 30g
- Dietary Fiber: 5g! Yes!
- Protein: Around 5g
- Sugar: About 12g (This is mostly from the brown sugar and natural sources)
I always tell people, look at that fiber number! That’s what makes these **bran muffins** so much better than the standard fluffy, sugary ones you often find advertised. It proves we managed to keep them wholesome and delicious at the same time. They are the perfect accompaniment to a cup of coffee or tea for that crucial morning energy boost.
Share Your Homemade Bran Muffins Experience
Now that you’ve got the secrets to making these incredibly **moist bran muffins**, I really want to hear how they turned out! Food is meant to be shared, and there’s no better feeling than seeing someone else enjoy a recipe that took me ages to perfect.
Did you stick to the 10-minute bran soak? Did you swap in some pecans instead of raisins? Tell me everything! The texture is what matters most to me. I want to know if these ended up being the softest, most satisfying **healthy breakfast muffins** you’ve ever baked at home.
Give this recipe a rating right below so other bakers know it’s reliable! And if you snapped a picture of your beautiful, domed batch, feel free to send it over or tag me on social media. I love seeing these wholesome baked goods out in the wild. If you have any last-minute questions or need clarification on the freezing tips, don’t hesitate to drop a comment below or reach out through my contact page. Happy baking!
PrintMoist High-Fiber Bran Muffins
A simple recipe for classic bran muffins that results in a moist texture and is high in fiber. These are excellent for make-ahead breakfasts.
- Prep Time: 15 min
- Cook Time: 18 min
- Total Time: 33 min
- Yield: 12 muffins
- Category: Breakfast
- Method: Baking
- Cuisine: American
- Diet: Vegetarian
Ingredients
- 1 cup wheat bran
- 1 cup boiling water
- 1 cup buttermilk
- 1 large egg
- 1/4 cup vegetable oil
- 1/2 cup packed brown sugar
- 1 teaspoon vanilla extract
- 1 1/2 cups whole wheat flour
- 1 teaspoon baking soda
- 1/2 teaspoon salt
- 1/2 cup raisins (optional)
Instructions
- Preheat your oven to 400 degrees F (200 degrees C). Line a 12-cup muffin tin with paper liners or grease well.
- In a medium bowl, combine the wheat bran and boiling water. Let this mixture stand for 10 minutes.
- Add the buttermilk, egg, oil, brown sugar, and vanilla extract to the soaked bran. Mix until just combined.
- In a separate bowl, whisk together the whole wheat flour, baking soda, and salt.
- Add the dry ingredients to the wet ingredients. Mix gently until just combined. Do not overmix. Fold in raisins, if using.
- Divide the batter evenly among the prepared muffin cups, filling each about two-thirds full.
- Bake for 15 to 18 minutes, or until a toothpick inserted into the center comes out clean.
- Cool in the pan for 5 minutes before transferring to a wire rack to cool completely.
Notes
- For a different flavor, substitute 1/2 cup of the wheat bran with oat bran.
- You can replace the brown sugar with maple syrup, using 1/3 cup instead.
- These muffins freeze well. Cool them completely, then place them in a freezer-safe bag for up to three months. Thaw overnight on the counter or microwave briefly.
Nutrition
- Serving Size: 1 muffin
- Calories: 180
- Sugar: 12
- Sodium: 180
- Fat: 6
- Saturated Fat: 1
- Unsaturated Fat: 5
- Trans Fat: 0
- Carbohydrates: 30
- Fiber: 5
- Protein: 5
- Cholesterol: 25