

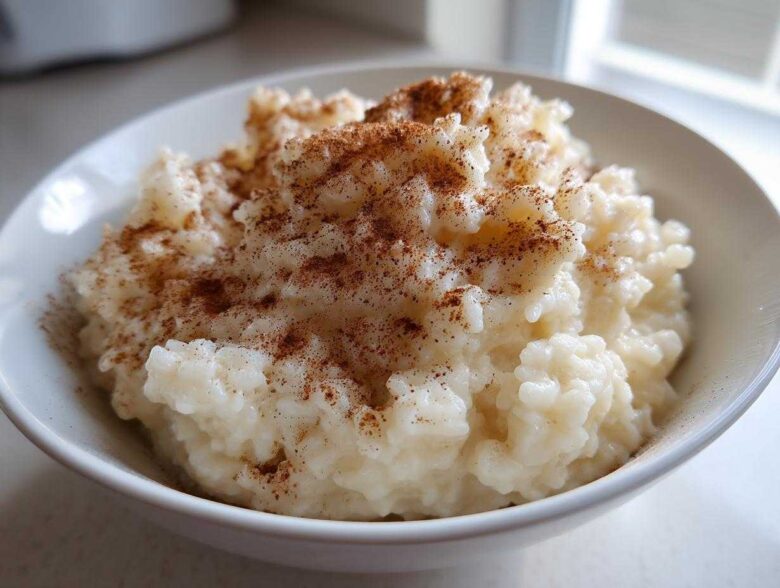
Some days, you just need a hug in a bowl, right? That’s exactly what my Old-Fashioned Creamy Stovetop Rice Pudding delivers. Forget those watery, bland versions you might have tried; this is the real deal—thick, deeply comforting, and wonderfully simple. I spent years in my kitchen battling the dreaded scorched bottom while trying to get that perfect velvety texture on the stovetop. Oops! But trust me, I finally nailed the technique to keep it silky smooth every single time without needing to turn on the oven.

This recipe is pure nostalgia, hitting all those right notes with vanilla and just the perfect amount of cinnamon. If you’ve been searching for the best rice pudding recipe that tastes like your grandmother made it, stop looking now. It’s quick enough for a weeknight, but special enough for a weekend treat. For more cozy baked goodness, you might want to check out my easy classic French toast recipe, but if you want pure, creamy comfort, stick right here!
Why This Old Fashioned Rice Pudding Recipe Delivers Comfort
When I promise you comfort food, I mean it. This isn’t just a dessert; it’s an instant mood-booster, perfect for curling up on a chilly evening. We’re leveraging simple, wholesome ingredients because the flavor should come from the slow cooking, not from a mountain of obscure spices. If you love making homemade granola clusters, you appreciate simple goodness, and this recipe is right in that lane.
Achieving the Perfect Creamy Texture
The secret to that thick, spoonable consistency lies in two things: using short-grain rice, which releases tons of starch, and patience during the simmering time. That slow cook infuses every grain. Plus, we’re very careful with the eggs—tempering them slowly ensures we get a perfectly smooth, lush sauce, not scrambled bits. It’s all about technique, not complexity.
Simple Ingredients for Classic Rice Pudding
You won’t need to run to three different specialty stores, I promise. This recipe relies on pantry staples you probably already have on hand. That’s why it earns the title of an easy rice pudding. We are making traditional, high-quality rice pudding without any fuss.
Essential Ingredients for Creamy Rice Pudding
This is where we build that amazing texture, and honestly, you don’t need much! Because we’re aiming for that rich, old fashioned rice pudding flavor, the quality of your milk really matters. I insist on using whole milk here; that extra bit of fat is what separates a good dessert from a truly great one. You can see exactly what you need below. If you love making fluffy buttermilk pancakes, you already know that great ingredients make the difference!
- 1 cup short-grain white rice
- 4 cups water
- 1/2 teaspoon salt
- 4 cups whole milk (Yes, whole milk is key for creaminess!)
- 1/2 cup granulated sugar
- 2 large eggs, lightly beaten
- 2 teaspoons vanilla extract
- 1/2 teaspoon ground cinnamon, plus extra for topping
Step-by-Step Instructions for Stovetop Rice Pudding
Okay, let’s get cooking! This is where some folks get nervous, especially with the milk and eggs involved, but if you follow my lead, you’re going to create a batch of seriously authoritative, delicious, stovetop rice pudding. I highly recommend using a heavy-bottomed pot for this whole process; that’s your insurance policy against scorching, trust me. If you’ve mastered stir-fried udon noodles, you know why the right pan matters!
Initial Cooking Phase: Absorbing the Water
We start simple. Grab your pot and mix the rice, water, and salt. Turn the heat up to medium-high and bring it to a boil. Once it’s bubbling away, drop the heat way down to low, put the lid on, and let it simmer for about 15 minutes. You want most of that initial water gone, but you need to stir it now and then—just a quick swipe on the bottom so the grains don’t glue themselves there.
Thickening the Rice Pudding with Milk
Now for the richness! Pour in all four cups of whole milk. Bring this gentle simmer up over medium heat, but watch it like a hawk. You need to stir frequently now. We’re looking for that beautiful, thick consistency that defines a great creamy rice pudding recipe. This part can take 30 to 40 minutes, so keep that heat gentle—we want simmering, never a rapid boil, or you risk scorching that beautiful milk.
Tempering Eggs for Smooth Rice Pudding
This next part is the magic trick that keeps your eggs smooth instead of curdled in your rice pudding. First, take the pot completely off the heat. Whisk a small ladleful of that hot milk mixture into your lightly beaten eggs—this is called tempering, and it slowly brings the eggs up to temperature. Once they’re warmed up, slowly, I mean slowly, pour the tempered egg mixture back into the main pot while stirring constantly. Pop it back on the lowest heat, stir for just two or three minutes until it thickens slightly more, and then STOP! Do not let it boil after the eggs go in, or you’ll lose that smooth texture you worked so hard for.
Expert Tips for the Best Rice Pudding Recipe
You’ve got a fantastic bowl of homemade pudding dessert right here, but knowing a couple of little tricks will elevate it from great to absolutely legendary. Having made this so many times, I can tell you that managing the final texture is crucial. If you’re planning a menu, remember you can prepare this ahead of time, making it a fantastic side dish addition or dessert option for entertaining.
Don’t stress if your finished rice pudding seems a touch looser than you hoped when you first ladle it out of the pot. That’s intentional! The magic of quality starch happens as it rests. Never rush the cooling process if you want that perfect scoopable texture.
Adjusting Consistency and Richness
The biggest thing I tell people is this: it continues to set up as it cools down. If you want a really firm batch—say, for packing into individual containers or eating cold the next day—just let it sit on the counter for 30 minutes after you stir the vanilla in. It firms up beautifully. If you tried to eat it piping hot right off the stove, it would just be soup!
Now, if you want to make this feel like a total splurge, try doubling down on the richness! The recipe calls for whole milk, which is stellar, but if you’re feeling extra decadent, swap out one half-cup of that milk for heavy cream. Just a small change, but WOW, that extra fat adds a luxurious mouthfeel that makes this creamy rice pudding recipe feel straight out of a fancy bakery. It’s simple, but it makes a huge difference in the final product.
Serving Suggestions for Warm Sweet Treats
This wonderful classic comfort dessert is so versatile! The way you serve it totally changes the vibe from cozy nightcap to elegant finish. Since we infused ours with plenty of vanilla and cinnamon, you already have two major flavor bases covered, but we can certainly play around with those toppings!
Most of the time, I prefer this pudding when it’s still gently warm. You know, that beautiful temperature where it’s soft and flowing but not scalding hot. That’s when the cinnamon aroma really pops off the bowl. If you are digging into a bowl of these warm sweet treats, a simple sprinkle of extra ground cinnamon on top is all you need. It looks pretty, and honestly, it enhances the flavor experience tenfold.
However, I know some folks swear by their pudding cold—and that’s fine too! If you chill it down, it firms up much more, behaving almost like a dense custard. If you’re making this a day ahead and planning to serve it chilled, I always suggest giving it a quick stir before scooping, maybe thinning it slightly with a splash of milk if it got too stiff in the fridge. Don’t forget how much fun it is to make great snacks, too; these flavors pair great after you finish those homemade guacamole and baked tortilla chips!
For an extra indulgent serving, try adding a spoonful of high-quality fruit preserves on top—something tart like raspberry works really well to cut through the sweetness of this vanilla rice pudding. Or, for a real treat, a drizzle of caramel sauce just takes it over the top! It’s your pudding, so make it perfect for you!
Storing and Reheating Your Homemade Pudding Dessert
Now that you’ve conquered the stovetop and made a massive, glorious batch of rice pudding, the natural next question is: how long does this deliciousness last in the fridge? Since this recipe is loaded with milk and eggs, proper storage is super important for both safety and taste. I usually make a batch large enough to last us three or four days, which means I’m constantly reheating leftovers—it’s the perfect grab-and-go snack!
The most important thing to know for planning ahead is that this wonderful dessert changes texture once it chills down. When it’s warm, it’s luscious and flowing. When it’s cold, it sets up quite firmly—think of a very soft, scoopable custard. Don’t panic when you pull it out the next day; it’s supposed to be that way! If you’re making this for a dinner party later in the week, this tendency to firm up is actually a bonus; it means you can prep this amazing chocolate peanut butter smoothie alternative ahead of time.
Store your leftover rice pudding in airtight containers. Small individual mason jars work perfectly for grab-and-go portions, but any good container with a tight seal will do. It keeps great in the refrigerator for about four days. Don’t leave it sitting on the counter for hours, though! We want to keep that milk nice and cold once it’s done cooking.
When you’re ready to enjoy it again, you have two paths to reheat. The first is the microwave, which is quick and easy. Pop a serving into a microwave-safe bowl and heat it in 30-second bursts, stirring well in between. You will notice it loosens up immediately as the heat returns. If it seems too thick after microwaving—like it’s lost some of its creamy vibe—just stir in a tiny splash of fresh whole milk, maybe a teaspoon at a time, until it’s back to your preferred consistency. It helps bring that fresh-off-the-stove feel right back to your leftovers!
Common Questions About Making Rice Pudding
I get so many emails asking about my stovetop method, and truthfully, most questions boil down to simple technique tweaks. It’s okay if you weren’t sure when to add the eggs or what kind of rice to use! I’ve gathered up the most common things folks ask me when they’re trying to master this easy rice pudding for the first time. Hopefully, these clear up any lingering doubts so you can get back to enjoying that warm bowl!
Can I use long-grain rice instead of short-grain for this rice pudding?
While you technically *can*, I really, really advise against it if you’re after that rich, classic experience. Short-grain rice (like Arborio or sushi rice) has more starch, and that starch is what dissolves into the milk to create that signature creamy texture we are aiming for. Long-grain rice stays a bit firmer and won’t give you that lush sauce; it ends up feeling more like separate rice grains swimming in milk rather than a cohesive dessert.
How do I prevent the rice pudding from sticking to the bottom of the pan?
This is the number one fear when making anything creamy on the stove! Rule number one? Use a heavy-bottomed saucepan—that thick metal base really distributes the heat evenly so you don’t get hot spots. Rule number two is constant vigilance once you add the milk. You must stir frequently, scraping right along the bottom of the pot as you go. If you feel any resistance or hear scraping sounds early on, lower the heat immediately! Better safe than sorry, right? This care is what makes the difference between a great batch and a burnt mess you have to throw out. If you’re looking for other easy cooking tips, check out these notes on making garlic knots.
Can this be made ahead of time?
Absolutely, yes! This is one of the best things about this recipe—it’s fantastic for make-ahead dessert rice. Just remember what I mentioned earlier: as it chills in the fridge, it’s going to set up quite firmly. If you plan on serving it the next day, have some fresh milk ready. When reheating a portion in the microwave, stir in a teaspoon or two of cold milk until it softens up and regains some of that creamy flow. It tastes just as comforting the next day!
Rice Pudding Variations and Flavor Additions
Even though this recipe is my absolute favorite version of rice pudding—the one I turn to again and again—it’s so delightfully simple that it begs for little tweaks based on what you have lying around! Creating your own rice pudding variations is part of the fun of cooking from scratch. Since the base flavor profile is so clean—just sweet milky rice with vanilla and cinnamon—it’s like a blank canvas!
The core recipe already features delicious cinnamon and vanilla, but if you want to jazz things up for your next batch, I have a few ideas that readers often write to me about. You can try these additions either during the last 10 minutes of simmering or right after you stir in the vanilla extract. Don’t forget to check out my recipe for avocado chocolate chip ice cream if you want another creamy dessert adventure!
First off, let’s talk dried fruit. If you love raisins, now is the time to add them! I like to plump them up first by soaking a half-cup of them in hot water or even a little splash of rum for about 10 minutes before draining them off and stirring them in. They plump up beautifully and give you these sweet little bursts as you eat. But be careful not to add too many, or you might change the consistency!
If you are a fan of citrus, and I know some of you are, a little bit of zest goes a mile. About one teaspoon of fresh orange zest stirred in at the very end warms up beautifully with the cinnamon notes we already have going on. It’s bright, it’s happy, and it makes the whole dessert feel summery even when it’s served warm.
Finally, don’t get stuck on just cinnamon! Nutmeg is a wonderful companion, especially if you’re serving this chilled later on. A tiny pinch of freshly grated nutmeg along with the cinnamon adds depth. Or, for a much warmer, cozier feel, try swapping out the ground cinnamon for a teaspoon of classic pumpkin pie spice—it transforms this simple old fashioned rice pudding into an immediate autumn delight, no matter the season!
Nutritional Estimates for This Dessert
I always hear from folks who want to enjoy their favorite comfort foods without feeling guilty, and I totally get that! While this rice pudding is rich because we use whole milk and eggs—which is how you get that amazing creamy texture we talked about—it’s still lovely to have a general idea of what’s in that bowl. Remember, these numbers are just estimates based on the straightforward ingredients in our recipe, and the final tally can change depending on what brands you buy or if you add extra swirls of cream or toppings.
If you’re into tracking macros or just curious, here is the nutritional breakdown for one serving size based on our recipe. Knowing this helps when you’re planning meals, maybe alongside something healthy like this tuna quinoa bowl recipe for dinner!
- Serving Size: 1 cup
- Calories: 320
- Sugar: 22g
- Sodium: 250mg
- Fat: 8g
- Saturated Fat: 4g
- Unsaturated Fat: 4g
- Trans Fat: 0g
- Carbohydrates: 55g
- Fiber: 1g
- Protein: 10g
- Cholesterol: 75mg
See? Ten grams of protein is fantastic for a dessert! That comes straight from the milk and the eggs, which is one of those built-in bonuses of sticking to this wholesome, old fashioned rice pudding style. Enjoy every bite!
PrintCreamy Old-Fashioned Stovetop Rice Pudding
A simple recipe for classic, creamy stovetop rice pudding flavored with vanilla and cinnamon.
- Prep Time: 10 min
- Cook Time: 55 min
- Total Time: 65 min
- Yield: 6 servings
- Category: Dessert
- Method: Stovetop
- Cuisine: American
- Diet: Vegetarian
Ingredients
- 1 cup short-grain white rice
- 4 cups water
- 1/2 teaspoon salt
- 4 cups whole milk
- 1/2 cup granulated sugar
- 2 large eggs, lightly beaten
- 2 teaspoons vanilla extract
- 1/2 teaspoon ground cinnamon, plus extra for topping
Instructions
- Combine rice, water, and salt in a heavy-bottomed saucepan. Bring to a boil over medium-high heat.
- Reduce heat to low, cover, and simmer for 15 minutes, or until most of the water is absorbed. Stir occasionally to prevent sticking.
- Add the milk to the rice mixture. Bring to a gentle simmer over medium heat, stirring frequently. Cook for 30 to 40 minutes, stirring often, until the rice is tender and the mixture thickens. Do not let it boil rapidly.
- Remove the saucepan from the heat. In a small bowl, whisk a small amount of the hot milk mixture into the beaten eggs to temper them.
- Slowly pour the tempered eggs into the rice mixture while stirring constantly. Return the pan to low heat.
- Cook for 2 to 3 minutes, stirring constantly, until the pudding thickens slightly. Do not allow the mixture to boil after adding the eggs.
- Remove from heat. Stir in the vanilla extract.
- Serve warm, sprinkled with extra ground cinnamon.
Notes
- For a thicker pudding, let it cool slightly; it will continue to set as it cools.
- You can substitute 1/2 cup heavy cream for 1/2 cup of the whole milk for extra richness.
- This pudding tastes good chilled as well.
Nutrition
- Serving Size: 1 cup
- Calories: 320
- Sugar: 22
- Sodium: 250
- Fat: 8
- Saturated Fat: 4
- Unsaturated Fat: 4
- Trans Fat: 0
- Carbohydrates: 55
- Fiber: 1
- Protein: 10
- Cholesterol: 75